Tuesday, May 10, 2022

Adding list elements

Adding new items to a list is extremely easy. You simply tell the list to add them, as shown in the  following screenshot. This also demonstrates how any item can be placed in a list, even disparate data types:


The append() method simply adds a single item to the end of a list; it's different from concatenation since it takes a single object and not a list. The append() method changes the list in-place and doesn't create a brand new list object, nor does it return the modified list. To view the changes, you have to expressly call the list object again, as shown in line 3. So be aware of that in case you are confused about whether the changes actually took place.

If you want to put the new item in a specific position in the list, you have to tell the list which position it should be in; that is, you have to use the index of what the position is. This is demonstrated in line 4 of the previous screenshot.

You can add a second list to an existing one by using the extend() method. Essentially, the two lists are concatenated (linked) together, as shown in the following screenshot:


Be aware that there is a distinct difference between extend() and append(). The extend() function takes a single argument, which is always a list, and adds each of the elements of that list to the original list; the two lists are merged into one. The append() function takes one argument, which can be any data type, and simply adds it to the end of the list; you end up with a list that has one element, which is the appended object.

Compare line 10 in the following screenshot to line 8 in the previous screenshot. Whereas appending the new_l list to the original list simply added each item from new_l to the original, essentially increasing the number of elements, when extending the exact same new_l list to the original, the entire list object was added, rather than the individual elements.


One of the special things about lists is that they are mutable, this we'll discuss in the  next post


Share:

Monday, May 9, 2022

Lists

Lists in Python are one of the most versatile collection object types available. The other workhorses are dictionaries and tuples, but they are really more like variations of lists. Python lists do the work of most of the data collection structures found in other languages, and since they are built in, you don't have to worry about manually creating them. Lists can be used for any type of object, from numbers and strings to other lists. They are accessed just like strings (since strings are just specialized lists), so they are simple to use. Lists are variable in length; that is, they grow and shrink automatically as they're used, and they can be changed in place; that is, a new list isn't created every time, unlike strings. In reality, Python lists are C arrays inside the Python interpreter and act just like an array of pointers.

The following screenshot shows the creation of a list and a few examples of how to use it:


After the list is created in line 42, lines 43 and 44 show different ways of getting the values in a list; line 43 returns the list object while line 44 actually prints the items that are in the list. The difference is subtle, but will be more noticeable with more complicated code.

Line 45 returns the first item in the list, while line 46 pops out the last item. Returning an item doesn't modify the list, but popping an item does, as shown in line 47, where the list is visibly shorter.

The biggest thing to remember is that lists are series of objects written inside square brackets, separated by commas. Dictionaries and tuples will look similar except they have different types of brackets.

Lists are most often used to store homogeneous values; that is, a list usually holds names, numbers, or other sequences that are all one data type. They don't have to; they can be used with whatever data types you want to mix and match. It's just usually easier to think of a list as holding a standard sequence of items.

The most common use of a list is to iterate over the list and perform the same action to each object within the list, hence the use of similar data types. This simple iteration is shown in the following screenshot:


Line 48 defines the list as a sequence of string values. Line 49 creates a for loop that iterates through the list, printing out a phrase for each item.

Lines 50 and 51 show alternative ways of iterating through and creating lists. This method is called list comprehension and is frequently found in code as a shortcut to writing a normal for loop to make a new list. Line 51 demonstrates that additional information can be provided to the returned values, much like the values returned in line 49.

One thing to note right now, however, is that you can use whatever word for the placeholder that you want; that is, if you wanted to use the name number instead of item in the preceding examples, you can do that. This is key because it was a weird concept for me when I first encountered it in Python. In other languages, loops like this are either hardwired into the language and you have to use its format or you have to expressly create the x value beforehand so you can call it in the loop. Python's way is much easier because you can use whatever name makes the most sense.

In the next post we'll further explore lists and see how new items are added to a list.

Share:

Friday, May 6, 2022

Combining and separating strings

Strings can be combined (joined or concatenated) and separated (split) quite easily. Tokenization is the process of splitting something up into individual tokens; in this case, a sentence is split into individual words. When a web page is parsed by a browser, the HTML, JavaScript, and any other code in the page is tokenized and identified as a keyword, operator, variable, and so on. The browser then uses this information to display the web page correctly, or at least as well as it can.

Python does much the same thing. The Python interpreter tokenizes the source code and identifies the parts that are part of the actual programming language and the parts that are data. The individual tokens are separated by delimiters, characters that actually separate one token from another. If you import data into Excel or another spreadsheet program, you will be asked what it should use as a delimiter: a  comma, tab, space, and so on. Python does the same thing when it reads the source code.

In strings, the main delimiter is a whitespace character, such as a tab, a newline, or an actual space. These delimiters mark off individual characters or words, sentences, and paragraphs. When special formatting is needed, other delimiters can be specified by the programmer.

String concatenation was demonstrated in Basic string operations. An alternative way to combine strings is by joining them. Joining strings combines the separate strings into one string. The catch is that it doesn't concatenate the strings; the join() method creates a string in which the elements of a string sequence are joined by a given separator. The following screenshot demonstrates this action. Line 29 is a normal concatenation; the results are printed in line 31. Line 30 joins string 1 with string 2, with the results in line 32: 


As you can see, the results are not what you expect. The join() method is actually designed to be used to create a string where the individual characters are separated by a given separator character. The following screenshot demonstrates this more common use of join():


After a sequence of strings is created in line 35 (known as a tuple, and explained further in Tuples), the join() method is called in two different ways. Line 36 is a simple call of the function itself; the result is a string, with the quotation marks shown. Line 37 is the print() function calling join(); the resultant string is printed normally, without the quote marks.

Finally, splitting strings separates them into their component parts. The result is a list containing the individual words or characters. The following screenshot shows two ways to split a string: 


In line 39, the default split is performed, resulting in the string being split at the spaces between words. Line 41 performs the string split on the commas, though essentially any character can be used.


Share:

Thursday, May 5, 2022

String formatting

Formatting strings is simply a way of presenting the information on the screen in a way that conveys the information best. Some examples of formatting are creating column headers, dynamically creating a sentence from a list or stored variable, or stripping extraneous information from the strings, such as excess spaces.

Python supports the creation of dynamic strings. This means you can create a variable containing a value of some type (such as a string or number) and then call that value into your string. You can process a string the same way as in C if you choose to, such as %d for integers and %f for floating-point numbers.

The following screenshot shows this legacy method of formatting strings. Lines 1 and 2 define the substitution values that will be used.

Line 3 creates the string that will be output. Note that the substitution values are identified by position, as well as the fact that, when using an interactive Python session, the interpreter will patiently wait until all required information is presented. In this case, an extra parenthesis is added to complete the print() function:


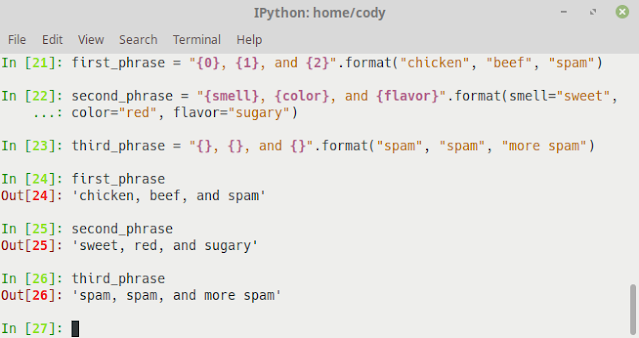
Since Python 2.6, an alternate way of formatting strings is to use a method call, shown in the following screenshot. Line 21 shows positional substitution, line 22 shows keyword substitution, and line 23 shows relative position substitution. Relative position may be the most common, but it can get out of hand with more than just a few substitutions.

The following screenshot shows an example of method string formatting:


Method string formatting is similar to the C# method, but it hasn't replaced the expression formatting. While the expression formatting is deprecated, it is still available in Python 3. However, method formatting provides more capabilities, so expression formatting is primarily found in legacy code. It's worth pointing out that, while you can frequently get the output you desire by calling the string object directly (as demonstrated in the previous example), it doesn't always work the way you want. Sometimes the object will only return a memory address, particularly if you are trying to print an instance of a class. Generally speaking, it's better to explicitly call the print() function if you want a statement evaluated and printed out. Otherwise, you don't know exactly what value it will return.

This is all about string formatting, next we'll discuss about combining and separating strings.

Share:

Wednesday, May 4, 2022

Indexing and slicing strings

Python strings functionally operate the same as Python lists, which are basically C arrays (see the Lists section). Unlike C arrays, characters within a string can be accessed both forward and backward. Frontward, a string starts off with a position of 0 and the character desired is found through an offset value (how far to move from the beginning of the string). However, you also can find this character by using a negative offset value from the end of the string.

The following screenshot briefly demonstrates this:


Line 30 creates a string variable, and then line 31 requests the characters at position 0 (the very first entry of the string), as well as the second character from the end of the string.

Indexing is simply telling Python where a character can be found within the string. Like many other languages, Python starts counting at 0 instead of 1. So the first character's index is 0, the second character's index is 1, and so on. It's the same counting backward through the string, except that the last letter's index is -1 instead of 0 (since 0 is already taken). Therefore, to index the final letter, you would use -1, the second-to-last letter is -2, and so on. Knowing the index of a character is important for slicing.

Slicing a string is basically what it sounds like: by giving upper and lower index values, we can slice the string into sections and pull out just the characters we want. A great example of this is when processing an input file where each line is terminated with a newline character; just slice off the last character and process each line.

The following screenshot demonstrates how string slicing works in more detail.


You'll note in the previous screenshot that the colon symbol is used when indicating the slice. The colon acts as a separator between the upper and lower index values. If one of those values is not given, Python interprets that to mean that you want everything from the index value to the end of the string. In the preceding example, the first slice is from index 1 (the second letter, inclusive) to index 3 (the fourth letter, exclusive). You can consider the index to actually be the space before each letter; that's why the letter m isn't included in the first slice but the letter p is. 

The second slice is from index 1 (the second letter) to the end of the string. The third slice starts as the beginning of the string and includes everything except the last character.

One neat feature about the [:-1] index: it works on any character, not just letters or numbers. So if you have a newline character (\n), you can put [:-1] in your code to slice off that character, leaving you with just the text you care about.

You'll see that entering -1 as the ending value makes it easy to find the end of a string. You could, alternatively, use len(S) to get the length of the string, and then use that to identify the last value, but why bother when [:-1] does the same thing?

You could also use slicing to process command-line arguments by filtering out the program name. When the Python interpreter receives a program to process, the very first argument provided to the OS is the name of the program. By slicing out the first argument, we can capture the real arguments for processing.

For example, the following code shows how Python can automatically strip out the program's name from a list of arguments passed in to the operating system:

capture_arguments.py

1 import sys

2 if len(sys.argv) > 1: # Check if arguments are provided

3 entered_value = sys.argv[1:] # Capture all arguments except program name

Next we'll discuss about string formatting.

Share:

Tuesday, May 3, 2022

Strings

Strings in programming are simply text; either individual characters, words, phrases, or complete sentences. They are one of the most common elements to use when programming, at least when it comes to interacting with the user. Because they are so common, they are a native data type within Python, meaning they have many powerful capabilities built in. Unlike other languages, you don't have to worry about creating these capabilities yourself. 

Strings in Python are different than in most other languages. First off all, there are no char types, only single character strings (char types are single characters, separate from actual strings, used for memory conservation). Strings also can't be changed in-place; a new string object is created whenever you want to make changes to it, such as concatenation. This means you have to be aware that you are not manipulating the string in memory; it doesn't get changed or deleted as you work with it. You are simply creating a new string each time.

Empty strings are written as two quotes with nothing in between. The quotes used can be either single or double; my preference is to use double quotes, since you don't have to escape the single quote to use it in a string. That means you can write a statement like the following:

"And then he said, 'No way', when I told him."

If you want to use just one type of quote mark all the time, you have to use the backslash character to escape the desired quote marks so Python doesn't think it's at the end of the phrase, like this:

"And then he said, \"No way\", when I told him."

Triple quoted blocks are for strings that span multiple lines. Python collects the entire text block into a single string with embedded newline characters. This is good for things like writing short paragraphs of text; for example, instructions, or for formatting your source code for clarification.

Basic string operations

The + and * operators are overloaded in Python, letting you concatenate (join together) and repeat string objects, respectively.

Overloading is just using the same operator to do multiple things, based on the situation where it's used; you'll also see the term polymorphism. For example, the + symbol can mean addition when two numbers are involved or, as in this case, combining strings.

Concatenation combines two (or more) strings into a new string object, whereas repeat simply repeats a given string a given number of times.

The following screenshot demonstrates some of the Python operators that are overloaded. Line 21 shows string concatenation: the combining of multiple strings into a new, single string. In this case, the + operator is overloaded to combine strings but, when used with numbers (line 22), the operator will provide the sum of the values.

Note that in line 23, trying to use the + operator with a number and a string results in an error, as Python doesn't know how to process that command. The error indicates that trying to use the + operator to combine an integer number with a text string won't work, because Python doesn't know whether you want to add two numbers or concatenate two strings. Therefore, the error states that combining the two data types is unsupported.

Line 24 shows the * operator used with a string to return multiple copies of that string in a new, combined string. Line 25 shows normal mathematical use of the * operator, returning the product of two numbers:


Because Python doesn't know how to combine a string with a number, you can explicitly tell Python that a number should be a string through the str() function, as shown in the following screenshot. This is similar to casting values in C/C++. It informs Python that the number is not an integer or floating-point number but is, in reality, a text representation of the number. Just remember that you can no longer perform mathematical functions with it; it's strictly text:


Iteration in strings is a little different than in other languages. Rather than creating a loop to continually go through the string and print out each character, Python has a built-in type for iteration, utilizing a for loop.

Python accepts a given sequence and then performs one or more actions to each value within the sequence.

The following screenshot provides a demonstration of this:


Line 27 assigns a string variable. In line 28, Python is sequentially going through the myjob variable and printing each character that exists in the string. By default, the print() function assigns a newline character to the end of each item that is printed. In this case, since we want to print each character that is in the lumberjack string, each character will be printed on a separate line.

If you want to print the results on a single line, you'll have to do a little printing manipulation. As a function, print() has some additional parameters available; in this case, we can use the end keyword as a print() argument, as shown in line 29, where the end parameter (with no value) has been added. This tells Python that there should be no ending character inserted after printing an individual character, resulting in everything being printed on a single line. 

In the next post we'll cover Indexing and slicing strings. 


Share:

Wednesday, April 27, 2022

Octoparse

Let’s focus on the Octoparse Web Scraping tool, which helps us quickly fetch data from any website without coding techniques and anyone can use this tool to build a crawler in just minutes as long as the data is visible on the web page. If you asked me in short words about this tool, I would say this is a “No-code (or) Low-code web scraping tool.”, It takes really substantial time and be good to cope with a web-scraping. Since most companies are busy maintaining a business, data related services with low-code web scraping tools for a better choice to improve their productivity.

Ultimately the primary reason always is that it saves time across all industries. Certainly, everyone can take the advantage of the interactive workflow and intuitive tips guide to build their own scrapers.

Octoparse can fulfil most of the data extractions requirements to scrape the data from different websites like E-commerce, Social-Media, Structured and Tabulated pages. And it has capable of satisfying use cases like price monitoring, social trend discovery, risk management and many more.

There are many features that are there, let’s discuss a few major in this article.

Hardware and Software Requirements

To run Octoparse on your system and to use the easy web-scraping workflow, your system only needs to fulfil the following requirements:

Operating Systems:

  • Win7/Win8/Win8.1/Win10(x64)
  • Mac users can download the Mac version of Octoparse directly from the website.

Software

  • Microsoft .NET Framework 3.5.

Internet Access

Environment of Octoparse

Let’s discuss the Octoparse environment, The Workspace is the place where we can build our set of tasks. There are four parts to it, each one plays its particular purpose.

  • The Built-in Brower: Once you’ve entered a target URL page, the webpage will be loaded in Octoparse’s built-in browser. you can browse any website in the browse mode of operation, or you can click to extract the data you need in Select mode.
  • The Workflow: To interact with the webpage(s), such as opening a web page, or clicking on a page element(s), the entire process is defined automatically in the form of a workflow.
  • Tips Box: It uses smart Tips to “talk” to you during the extraction process and to guide you through the task building process.
  • Data Preview: You can preview the data selected. It provided the option to rename the data fields or remove the undesirable items that are not needed.

The Octoparse installation package can be downloaded on the official website

How does Octoparse Work?

It automatically extracts the web page data by opening a web page and clicking the page like human browsing the page and starts extracting the data in a well-defined workflow and each action is pertaining to the target and objective of the purpose.

  • Simulation
  • Workflow
  • Extraction

Understand the Octoparse Interface

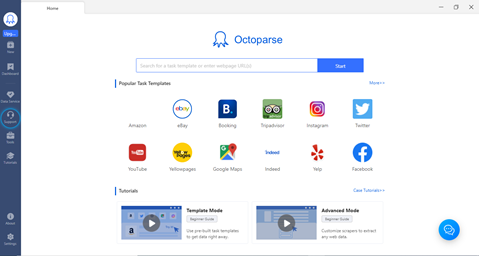
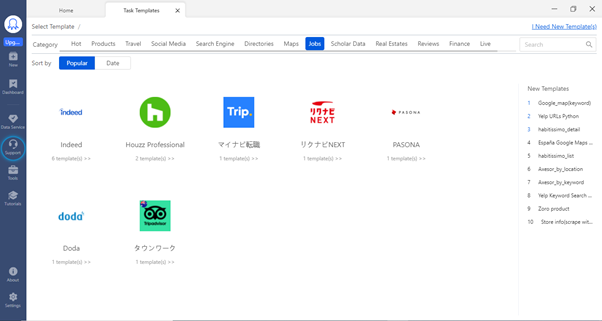
Since Octoparse provides a very rich and user-friendly interface, anyone can do the data extraction from any web page. I could recommend the favoured task template would satisfy most of the tasks in a few minutes. It would be the data for analysis from various classifications like – Products, Travel, social media, Search Engines, Jobs, Real Estate and Finance.

The main tabs are New, Dashboard, Data Services, Tools, and Tutorials

Let’s explore each item quickly.

Home Page


Octoparse Home Page

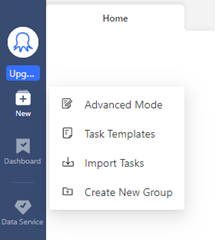
Workflow: The workflow-based design has been put in place in such a way, that it can be operated exclusively within GUI. Scripts or manual insertion of code is partly possible, but not necessary. In Octoparse Workflow there are two methods you can use that are nothing but Advanced Mode and the Template Mode.

Workflow


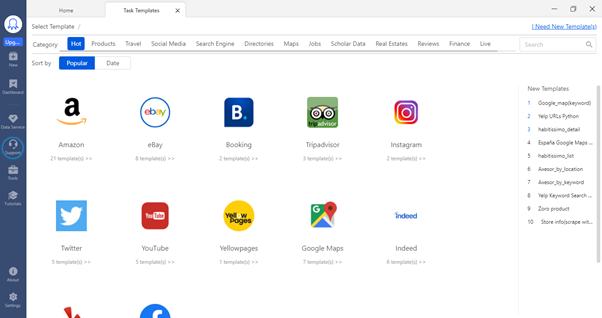
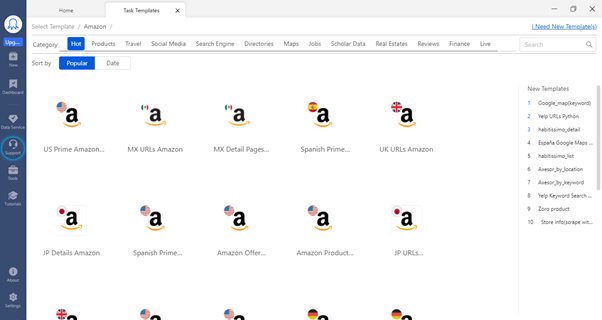
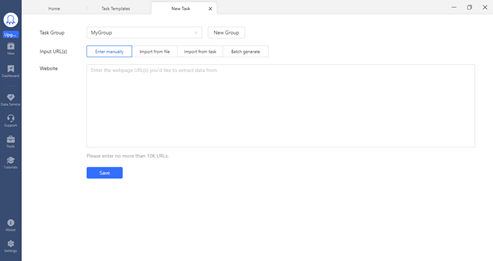
Task Templates: Which is used for pre-built tasks to get data by entering simple parameters like URL(s) or keywords. There are over 60+ templates for most mainstream websites. There is no need to build anything specifically and no technical chandelles. Simply select a template you need, check the sample data to see if it gets what you need, and extract the data right.

Task Templates
Task Templates

You can very well go into a group of templates specific to a country, based you can extract the data for use cases analysis.

Task Templates Image 3


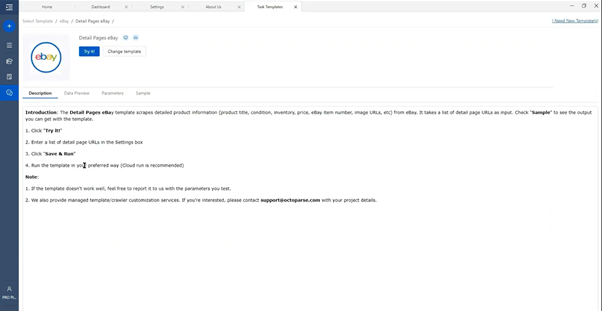
Templates Configuration

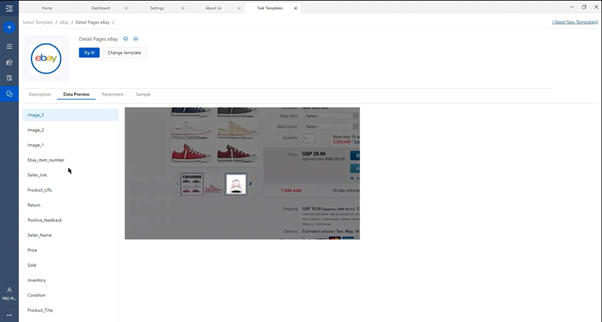
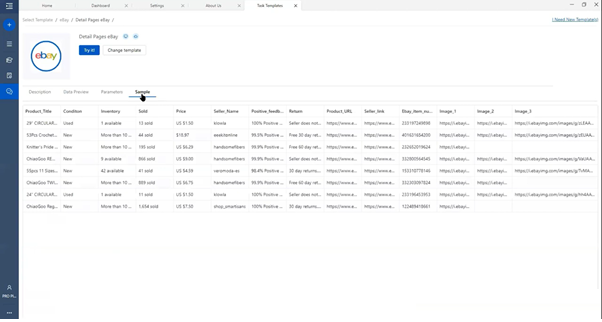
  • Data preview: The data preview tab will help you to find out the list of items extracted during the process.
  • Parameter: The parameter would help you to get the URL to run for your data extraction.
  • Sample: This tab will give you the extracted data in tabular format.
  • Advanced Mode: The Advanced Mode use to take overall control of every step of your web scraping project.

Description

Templates Configuration
Templates Configuration Image 2

Extracted Data

Extracted Data

After a successful run, we could get all data in the tool and ready to further analysis.

Advanced Mode

Advanced Mode is a highly flexible and very powerful web-scraping mode than Task Templates. This is specifically for people who want to scrape from websites with complex structures for their project-specific.

The list of features of Advanced Mode:

  • Achieve the scraping data on almost all kinds of webpage
  • Extract data in different formats URL, image, and HTML
  • Design a workflow to interact with a web page such as login authentication, keyword searching
  • Customize your workflow, such as setting up a wait time, modifying XPath and reformatting the data extracted
Advanced Mode

There is a provision for Edit or Create your Advanced Workflow, which you could explore with the tool explicit. Here you could simulate real human browsing actions, such as the below steps.

  • Opening a web page
  • Clicking on a page element or button to extract data automatically.

The whole extraction process is defined automatically in a workflow with each step representing a particular instruction in the scraping task.

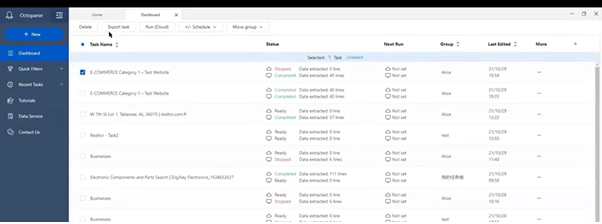
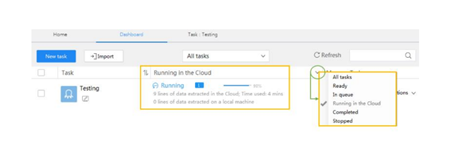
Dashboard: You can manage all your scraping tasks. Rename, Edit, Delete and Organize all the tasks. You can also conveniently schedule any tasks.

Dashboard

Extraction with the Octoparse Cloud

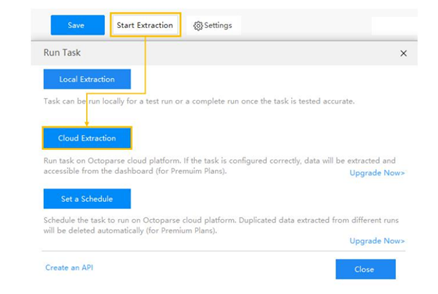
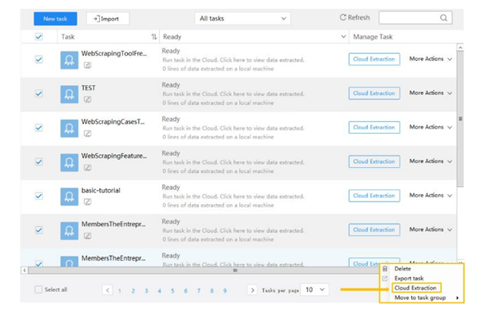
One of the nice features of Octoparse is a powerful Cloud platform for users can run their tasks 24/7. When you run a task with the “Cloud Extraction” option, it runs in the cloud with multiple servers using different IPs. Same time you can shut down your app or computer while the task is running. You need not worry about hardware and its limitation.

During this process data extracted will be saved in the cloud itself and can be accessed any time if you want. Here you can schedule the task, you can schedule your task to run as frequently as you need.

Octoparse cloud
Octoparse cloud Image 1


Octoparse cloud Image 2

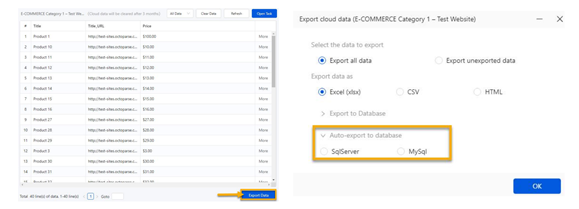
Auto-data export: The tool provided the Auto-Data export provision to export data to the database, and it can be automated and scheduled. There are multiple options to configure this feature and enhance more on the data export.

Auto-data export

This tool also provides the refine of your data, like as below list of tasks:

  • Rename/move/duplicate/delete a field
  • Clean data
  • Capture HTML code
  • Extract page level-based data and date & time

You must know the Anti-Blocking settings which are available in this tool, few of them are below and you can very well add these to your workflow settings.

  • IP Blocking:
    • Since some websites might be very sensitive to web scraping and take some serious anti-scraping measures, by blocking IPs to stop any scraping activities.
  • Browser recognition & Cookie Tracking:
    • Every request made by a web browser is eventually blocked, due to the user-agent, With the help of this tool, you can easily enable automatic user-agent rotation in your crawler to reduce the risk of being blocked.

Data Services: where you and your team of web scraping experts can build the whole web scraping process customized for your needs.

Data Services

Conclusion

Guys, so far we have explored what is Web Scraping, Crawler in detail and the scope of both techniques and their significance during the data preparations stage, then we focused on the Octoparse tool and its key features right from its Hardware and Software Requirements, the Environment of Octoparse, How Octoparse works, Understanding of the Octoparse Interface, Key components – Workflow, Dashboard and Data Services, Extraction with the Octoparse are high demand, especially the Auto-data export – IP Blocking features are really major milestones during the process. Undoubtedly, this too would fulfil most of the data extractions requirements to scrape the data from different websites and always is that it saves time. Since the tool supports over 60+ predefined templates for most mainstream websites our job would be very simple. Hope you got the high-level details of the Octoparse tool and its benefits. You can very well install the same and explore more. Thanks for your time on this Web Scraping article.

Share:

Tuesday, April 26, 2022

Web-Scraping

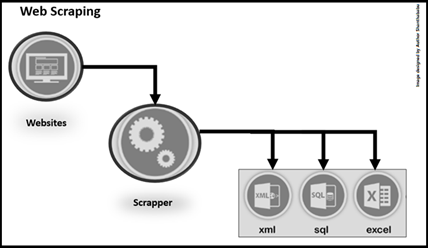
This is the process of extracting the diverse volume of data (content) in the standard format from a website in slice and dice as part of data collection in Data Analytics and Data Science perspective in the form of flat files (.csv,.json etc.,) or stored into the database. The scraped data will usually be in a spreadsheet or tabular format. It can be also called as Web-Data-Extraction, Web -Harvesting, Screen Scraping etc.

Is this Legally accepted?

As long as you use the data ethically, this is absolutely fine. Anyways we’re going to use the data which is already available in most of the public domain, but sometimes the websites are wished to prevent their data from web scraping then they can employ techniques like CAPTCHA forms and IP banning.


Crawler & Scraper

Let’s understand Crawler & Scraper:

What is Web Crawling?

In simple terms, Web Crawling is the set process of indexing expected business data on the target web page by using a well-defined program or automated script to align business rules. The main objective goal of a crawler is to learn what the target web pages are about and to retrieve information from one or more pages based on the needs. These programs (Python/R/Java) or automated scripts are called in terms of a Web Crawler, Spider, and usually called Crawler.

What is Web Scraper?

This is the most common technique when dealing with data preparation during data collection in Data Science projects, in which a well-defined program will extract valuable information from a target website in a human-readable output format, this would be in any language.

Scope of Crawling and Scraping

Data Crawling:

  • It can be done at any scaling level
  • It gives to downloading web page reference
  • It requires a crawl agent
  • Process of using bots to read and store
  • Goes through every single page on the specified web page.
  • Deduplication is an essential part

Data Scraping:

  • Extracting data from multiple sources
  • It focuses on a specific set of data from a web page
  • It can be done at any scaling level
  • It requires crawl and parser
  • Deduplication is not an essential part.

In the next post we'll focus on the Octoparse Web Scraping tool.
Share:

Saturday, April 23, 2022

Reading the Data using Spark

 Lets continue from where we left in the previous post.

df_spark = spark_session.read.csv('sample_data/california_housing_train.csv')

In the above code, we can see that spark uses the Spark session variable to call the read.csv() function to read the data when it is in CSV format now if you remember when we need to read the CSV file in padas we used to call read_csv().

According to me when we are learning something new which has stuff related to previous learning then it is good to compare both the stuff so in this article, we will also compare the pandas’ data processing with spark’s data processing.

df_spark

Output:

DataFrame[_c0: string, _c1: string, _c2: string, _c3: string, _c4: string, _c5: string, _c6: string, _c7: string, _c8: string]

Now if we look at the output so it shows that it has returned the DataFrame in which we can see the dictionary like setup where (c0, c1, c2…..c_n) is the number of columns and corresponding to each column index we can see the type of that column i.e. String.

PySpark’s show() function

df_spark.show()

Output:


From the above output, we can compare the PySpark’s show() function with the pandas head() function.

  • In the head() function, we can see the top 5 records (unless we don’t specify it in the arguments) whereas in the show() function it returns the top 20 records which are mentioned too at the last.
  • Another difference that we can notice is the appearance of the tabular data that we can see using both the function one can compare it as in the start of the article I’ve used head() function.
  • One more major difference that one can point out which is also a drawback of PySpark’s show() function i.e. when we are looking at the column names it is showing (c0, c1, c2…..c_n), and the exact column names are shown as the first tuple of records but we can fix this issue as well.

So let’s fix it!

df_spark_col  = spark_session.read.option('header', 'true').csv('sample_data/california_housing_train.csv')

df_spark_col

Output:

DataFrame[longitude: string, latitude: string, housing_median_age: string, total_rooms: string, total_bedrooms: string, population: string, households: string, median_income: string, median_house_value: string]

Okay! so now just after looking at the output, we can say that we have fixed that problem (we will still confirm that later) as in the output instead of (c0,c1,c2….c_n) in the place of column name now we can see the actual name of the columns.

Let’s confirm it by looking at the complete data with records.

df_spark = spark_session.read.option('header', 'true').csv('sample_data/california_housing_train.csv').show()

df_spark

Output

Now we can see that in the place of the columns we can now see the actual name of the column instead that indexing formatting.


Share:

Friday, April 22, 2022

PySpark using Python

Apache Spark is a sort of engine which helps in operating and executing the data analysis, data engineering, and machine learning tasks both in the cloud as well as on a local machine, and for that, it can either use a single machine or the clusters i.e distributed system.


We already have some relevant tools available in the market which can perform the data engineering tasks so in this section we will discuss why we should choose Apache Spark over its other alternatives.


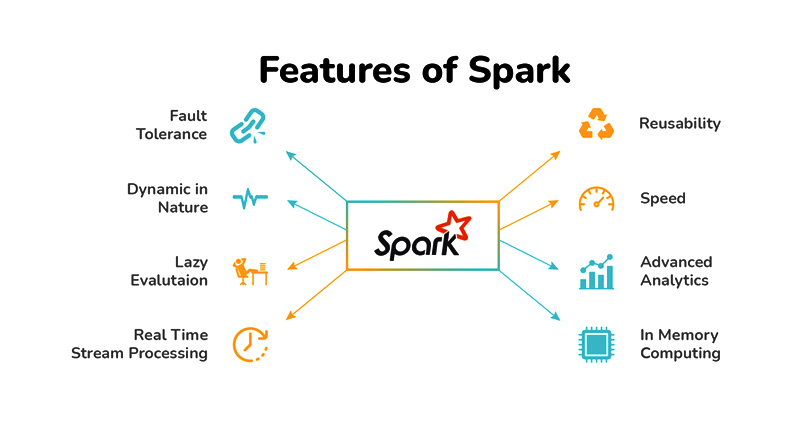
Features of Spark


  1. Streaming data: When we say streaming the data it is in the form of batch streaming and in this key feature Apache Spark will be able to stream our data in real-time by using our preferred programming language.
  1. Increasing Data science scalability: Apache Spark is one of the widely used engines for scalable computing and to perform Data science task which requires high computational power Apache Spark should be the first choice.
  1. Handling Big Data projects: As previously mentioned that it has high computational power so for that reason it can handle Big data projects in cloud computing as well using the distributed systems/clusters when working with the cloud, not on the local machines.
Installing PySpark Library using “pip”

pip install pyspark

Output:


After successfully installing PySpark


Importing PySpark Library

import pyspark

Reading the Dataset

Just before reading the dataset let me tell you that we will be working on the California House Price dataset and as I have worked on the Collab for handling PySpark operations so I got this dataset from the sample section.

import pandas as pd
data = pd.read_csv('sample_data/california_housing_test.csv')
data.head()

Output:


Now as we have imported the dataset and also have a look at it so now let’s start working with PySpark. But before getting real work with PySpark we have to start the Spark’s Session and for that, we need to follow some steps which are mentioned below.

  1. Importing the Spark Session from the Pyspark’s SQL object
  2. After importing the Spark session we will build the Spark Session using the builder function of the SparkSession object.
from pyspark.sql import SparkSession
spark_session = SparkSession.builder.appName('PySpark_article').getOrCreate()

Now as we can see that with the help of builder the function we have first called the appName class to name our session (here I have given *”PySpark_article”* as the session name) and at the last, for creating the session we have called getOrCreate() function and store it in the variable named spark_session.

spark_session

Output:


Now when we see what our spark session will hold it will return the above output which has the following components:

  1. About the spark session: In memory
  2. Spark context:
  • Version: It will return the current version of the spark which we are using – v3.2.1
  • Master: Interesting thing to notice here is when we will be working in the cloud then we might have different clusters as well like first, there will be a master and then a tree-like structure (cluster_1, cluster_2… cluster_n) but here as we are working on a local system and not the distributed one so it is returning local.
  • AppName: And finally the name of the app (spark session) which we gave while declaring it.
Next we'll see how to read data using Spark.
Share:

Thursday, April 21, 2022

Qubits

The qubit is short for “quantum bit.” While a bit can only be 0 or 1, a qubit can exist in more states. Qubits are surprising, fascinating, and powerful. They follow strange rules which may not initially seem natural to you. According to physics, these rules may be how nature itself works at the level of electrons and photons.

A qubit starts in an initial state. We use the notation |0⟩ and |1⟩ when we are talking about a qubit instead of the 0 and 1 for a bit. For a bit, the only non-trivial operation you can perform is switching 0 to 1 and vice versa. We can move a qubit’s state to any point on the sphere shown in the center of Figure 1.9. We can represent more information and have more room in which to work.


This sphere is called the Bloch sphere, named after physicist Felix Bloch. Things get even better when we have multiple qubits. One qubit holds two pieces of information, and two qubits hold four. That’s not surprising, but if we add a third qubit, we can represent eight pieces of information. Every time we add a qubit, we double its capacity. For 10 qubits, that’s 1,024. For 100 qubits, we can represent 1,267,650,600,228,229,401,496,703,205,376 pieces of information. This illustrates exponential behavior since we are looking at 2the number of qubits.

Some qubit features-

  • While we can perform operations and change the state of a qubit, the moment we look at the qubit, the state collapses to 0 or 1. We call the operation that moves the qubit state to one of the two bit states “measurement.”
  • Just as we saw that bits have meaning when they are parts of numbers and strings, presumably the measured qubit values 0 and 1 have meaning as data.
  • Probability is involved in determining whether we get • 0 or 1 at the end. 
  • We use qubits in algorithms to take advantage of their exponential scaling and other underlying mathematics. With these, we hope eventually to solve some significant but currently intractable problems. These are problems for which classical systems alone will never have enough processing power, memory, or accuracy.

Scientists and developers are now creating quantum algorithms for use cases in financial services and artificial intelligence (AI). They are also looking at precisely simulating physical systems involving chemistry. These may have future applications in materials science, agriculture, energy, and healthcare.

Share: