Tuesday, November 12, 2019

Python and ArcGIS

Although the menu-driven user interface of ArcGIS for Desktop allows for very complicated operations and sophisticated spatial analysis, at some point users will run into tasks that require something more. That’s where Python scripting comes in.

In a nutshell, Python scripting allows you to automate tasks in ArcGIS that would be quite cumbersome using the regular menu-driven interface. For example, consider having to convert 1,000 shapefiles into feature classes in a geodatabase. You could run the appropriate tool 1,000 times, but surely there must be a more efficient and robust way to do this. That’s what Python scripting will do, and you need only a handful of lines of code to carry out this task.

There is no ArcGIS-specific version of the Python language. The FOSS nature of Python makes it possible for Esri to distribute Python with ArcGIS software.. Python is supported on different platforms, including Windows, Mac, Linux, and many others. Python programs can work on any of these platforms with minimal change or sometimes no change at all. Since the ArcGIS for Desktop application runs only on Windows, this may not seem like a big advantage, but the user community for Python is large, in part due to its cross-platform nature. ArcGIS is designed to work with object-oriented languages, and Python qualifies in this respect.

Python scripting has become a fundamental tool for geographic information systems ( GIS ) professionals to extend the functionality of ArcGIS and automate workflows. Several years ago, probably the most widely used approach was to use the built-in VBA (Visual Basic for Applications)
programming tools. Since then, however, Python has emerged as a robust complement and alternative to VBA programming. Starting with ArcGIS 10, the VBA development environment is no longer installed by default, and Esri is actively discouraging the continued use of VBA. Although application development will continue to employ languages such as C++ and .NET, Python has a number of advantages, especially for GIS professionals who are not full-time programmers.

Python is not the only scripting language that can be used with ArcGIS, but it has certainly become the most widely used. This is largely because Python has the ease of use of a scripting language, as well as the programming capability of a complete developer language. Python is included in a typical ArcGIS for Desktop installation. Python has also been directly embedded in many tools in ArcGIS for Desktop. The Spatial Statistics toolbox, for example, consists almost entirely of Python scripts — even though the casual user does not necessarily notice ( or need to ). ArcGIS 10 has seen further integration of Python within the ArcGIS interface, and Esri has officially embraced Python as the preferred scripting tool for working with ArcGIS. Additional enhancements have been introduced in ArcGIS 10.1.

The Python version that is recommended for use with ArcGIS 10.1 is Python 2.7. Although you can download and install any version of Python for free, the installation of ArcGIS 10.1 comes with Python 2.7.2. Although version 2.x still works fine and continues to be widely used, a major new
version of Python was deemed necessary to remove a number of small problems that accumulated over the years and make the language even cleaner.

Although there are a number of differences between versions 2.7 and 3.x, the basic structure of the language has not changed. Despite the availability of version 3.x, ArcGIS 10.1 currently works with version 2.7. If and when version 3.x is adopted as the preferred version for use with ArcGIS, various
utilities are available to convert code between the two versions. It should be noted that although the installation of ArcGIS comes with Python, Esri did not develop Python. Esri relies on the FOSS nature of Python to distribute it with ArcGIS as the recommended scripting language.

In addition, Esri has created functionality in ArcGIS to make it easy to work with Python. However, Python is widely used for tasks other than writing scripts to work with ArcGIS. The added benefit is that as you start learning more about Python you will be able to start using it for both ArcGIS and other tasks as well.

Share:

The Future of Content Marketing

Today, the major part of a typical content marketing campaign process is manual. From keyword research and planning blog article topics, to content curation and sending emails, almost all lead generation tasks require human intervention.

However, Artificial Intelligence integration in the process will give marketers access to deeper, actionable insights and enable them to accurately predict outcomes. The introduction of AI in the field of content marketing will essentially allow marketers to focus on tasks of higher value that impact business performance and leave the mundane and repetitive tasks to the machines.

image2 2

The marketing automation that content marketers utilize today is still primarily manual. These platforms help to save time, increase efficiency and productivity, and drive performance. However, they do not provide deep insights into data, make recommendations on actions to take, predict outcomes or create content.

Artificial Intelligence will change all this for content marketers.

Let’s take a real-world example from the burgeoning entertainment industry that has seen revolutionary change with the advent of streaming video platforms.
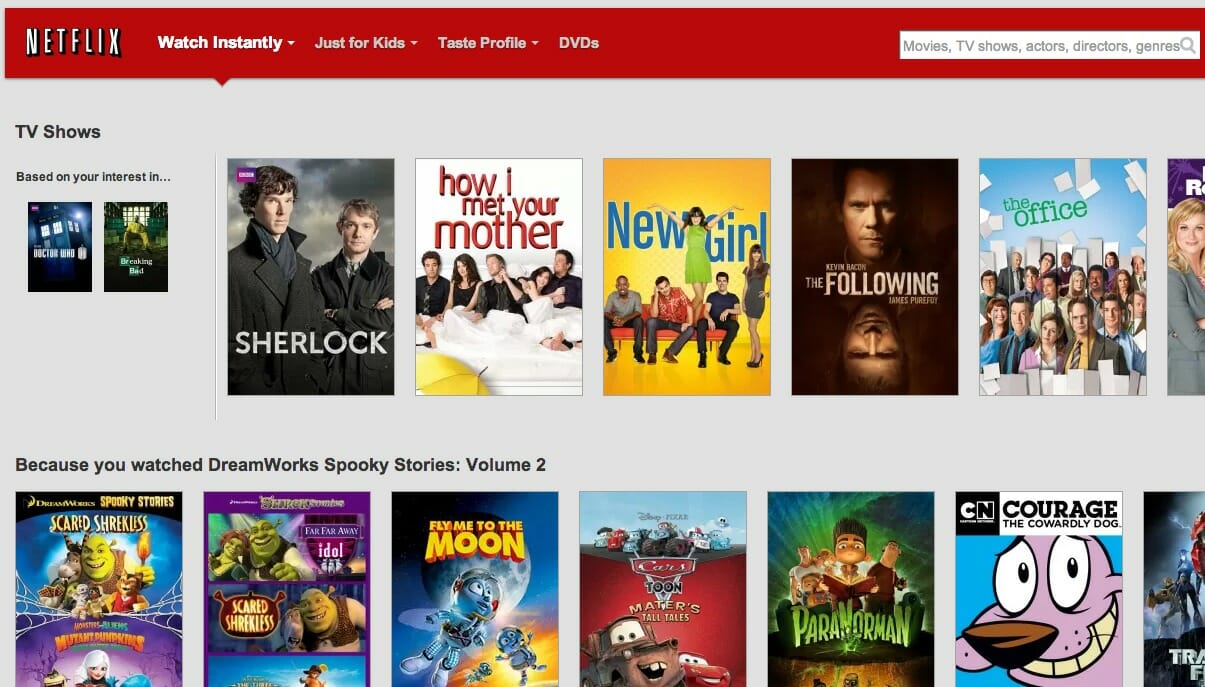
The video streaming platform Netflix recommends and creates video content and entertainment shows based on in-depth analysis of viewer data and individual preferences. This is possible because of a strategic integration of Machine Learning systems on Netflix’s platform.
Netflix recommendations

75% of what is viewed by audiences on Netflix is generated from algorithm-based recommendations.
Similarly, AI-powered algorithms also power self-driving vehicles by Tesla, voice recommendation engines like Microsoft’s Cortana and e-commerce giant Amazon’s product recommendations. And we're only going to see more of this in the very near future.

Content Marketing Is on the Brink of an AI Revolution

It is highly evident, based on recent trends in the market, that data science will effectively change how businesses are managed because computer systems are going to be our primary aids in redefining the way businesses interact with their customers.
  • If you want a credible example to highlight the changing face of content marketing, you need look no further than the social media network Facebook. After just a little over a decade in existence, Facebook is already harnessing Deep Learning capabilities with Deep Text, their AI language processing engine that has “near-human accuracy” in the way it understands and talks to real humans. Deep Text is used with their Messenger chatbot, to filter users’ News Feeds and perform facial recognition on photographs that are uploaded.
  • Media company NBCUniversal uses AI to create intelligent content, customized clip generators, and computer vision, which “automatically discovers the content and context of video, including data on who is in a scene, what is happening, what is being said, and even the underlying sentiment.”
  • Next Insurance uses Artificial Intelligence for its claims process that is “99.9% accurate” which allows the company to process their customers' claims a lot faster.
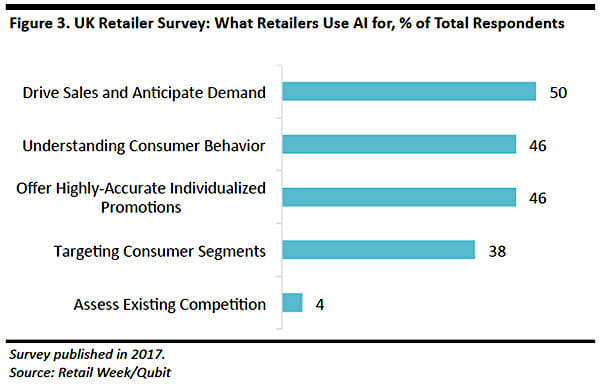
  • Spotify uses AI to offer personal music recommendations for its users, Apple uses AI for its virtual personal assistant Siri, and many retailer stores use AI for the perfect cross-channel experience for their customers.
retailers and AI

How to Survive and Grow in the Artificial Intelligence Age             

AI is already revolutionizing the marketing industry and will continue to transform jobs, disrupt content marketing much more rapidly than we can possibly imagine, and create immense opportunities for businesses that can effectively leverage this technology.
However, there are dedicated attempts being made to make Artificial Intelligence technology more cost effective, affordable and easily accessible, which should propel the development and wider adoption of AI across various industries. The challenge, then, will lie in employing technical talent that is capable of building and executing Artificial Intelligence and Machine Learning solutions.
Share:

Monday, November 11, 2019

Which Python Framework Is Better for Your Web Development, Flask vs. Django?


Django is a web framework through and through. Favoring a single-package, “batteries-included” approach to software development, it offers plenty of integrated, ready-to-use solutions.

Django is essentially a web framework on steroids, focused on delivering business value of the product, as opposed to forcing you to make technological decisions. For this reason, the framework is sometimes considered an enterprise solution, good for larger companies. It also includes a template system, built-in object-relational mapping (ORM), and custom admin panel.

The admin panel in particular is a great feature of Django that makes development incomparably easier. For many use cases related to advanced CRUD administration (“create, read, update, and delete”), the panel is more than enough to answer any and all of your needs and get you started fast.
That is, unless you give the panel to the end user, in which case support from Product Design will be necessary. But as long as the use of the panel is limited to you or the admin, it’s perfectly sufficient.
More importantly, though, Django is somewhat infamous for its monolithism. The framework takes an approach known as “convention over configuration”—making customization and modification more difficult, but for the price of simpler development and maintenance.

What is Django used for?

We’ve already mentioned that Django can be perfect for larger enterprises, but not all projects have that kind of scope since day one.
Let’s assume you know for a fact you’re going to either:
  1. start your app off small, but comprehensively, and keep it small in the future;
  2. start your app off small and grow it later.
In the latter case, what you may not know, though, is how you’re going to approach this planned future growth. Your product may be one thing in the beginning and something else entirely after three months of development. This happens more often than you’d think.

That’s where Django comes to the rescue. Should your app grow exponentially over time, the framework by default has what you’ll most certainly need. It offers greater flexibility in the later stages of development.

It’s possible to integrate those additional solutions with Flask, but the process is unstandardized at best. Large projects with many modules mean more work with Flask, which in turn means higher maintenance and costs of development.
All in all, it’s much safer to start development in Django and stick to it later if you scale up rapidly.

II. Why use Django?

Big businesses tend to choose Django for its comprehensiveness and the aforementioned “convention over configuration” approach, which also means a more standardized and simplified development process.

The framework’s inflexibility may be seen as less inviting to developers, but on the business end, it serves to cover all the bases and prepare you for any challenges Flask wouldn’t be as well equipped to handle. This lowers maintenance costs dramatically.

Another huge advantage of Django is its market presence. More developers are familiar with Django, since it’s more widespread than Flask, meaning it’s easier and faster for you to add people to your project and scale your team up.

MVP development and startups: Django or Flask?

Many businesses that are just starting up are looking to build an MVP of their product first—a raw, uncut version of their app that gives them a quick look at its performance.

Django usually allows you to develop an MVP in less time than Flask. While you can also build an MVP in Flask quickly, there’s a clear difference when frontend comes into play. In Django, you can add the frontend quicker to get feedback on it faster. Plus, you can then add JavaScript frameworks to Django.

When it comes to proofs-of-concept, Django is a better fit than Flask, too. Building something—anything—first, then adding new modules on top of it is easy and safe with this framework.
Django effectively positions itself as a “start fast” solution, giving you the ability to launch quickly and grow later. This makes the framework a no-brainer for most startups, though naturally not all of them.

If a particular startup wishes to experiment a great deal very early on, or intends to rely on a large number of microservices, then Flask will be the more optimal pick for them.


Share:

Tuesday, November 5, 2019

PollOpinion site in Django-6 ( Making pages for the PollSite)

In this post we'll work with Choice model and vote functionality. We begin with modifying the polls/templates/polls/detail.html file as shown below:

<h1>{{ question.question_text }}</h1>

{% if error_message %}<p><strong>{{ error_message }}</strong></p>{% endif %}

<form action="{% url 'polls:vote' question.id %}" method="post">
{% csrf_token %}
{% for choice in question.choice_set.all %}
    <input type="radio" name="choice" id="choice{{ forloop.counter }}" value="{{ choice.id }}">
    <label for="choice{{ forloop.counter }}">{{ choice.choice_text }}</label><br>
{% endfor %}
<input type="submit" value="Vote">
</form>

In the above code-

1. We display a radio button for each question choice. The value of each radio button is the associated question choice’s ID. The name of each radio button is "choice". That means, when somebody selects one of the radio buttons and submits the form, it’ll send the POST data choice=# where # is the ID of the selected choice.

2. We set the form’s action to {% url 'polls:vote' question.id %}, and we set method="post". Using method="post" (as opposed to method="get") is very important, because the act of submitting this form will alter data server-side. Whenever you create a form that alters data server-side, use method="post".

3. forloop.counter indicates how many times the for tag has gone through its loop.

4. All POST forms that are targeted at internal URLs should use the {% csrf_token %} template tag for protecting against  Cross Site Request Forgeries.

Next we'll create a Django view that handles the submitted data and provides some functionality. Open the polls/views.py file and modify it with the code as shown below:

def vote(request, question_id):
question = get_object_or_404(Question, pk=question_id)
try:
selected_choice = question.choice_set.get(pk=request.POST['choice'])

except (KeyError, Choice.DoesNotExist):
# Redisplay the question voting form.
return render(request, 'polls/detail.html', {'question': question,'error_message': "You didn't select a choice.",})

else:
selected_choice.votes += 1
selected_choice.save()
# Always return an HttpResponseRedirect after successfully dealing
# with POST data. This prevents data from being posted twice if a
# user hits the Back button.
return HttpResponseRedirect(reverse('polls:results', args=(question.id,)))

Let's explore the above code to understand the functionality:

1. The request.POST is a dictionary-like object that lets us access submitted data by key name. Thus, request.POST['choice'] returns the ID of the selected choice, as a string.

Django also provides request.GET for accessing GET data in the same way – but we’re explicitly using request.POST in our code, to ensure that data is only altered via a POST call.

2. The request.POST['choice'] will raise KeyError if choice wasn’t provided in POST data. The above code checks for KeyError and re-displays the question form with an error message if choice isn’t given.

3. After incrementing the choice count, the code returns an HttpResponseRedirect rather than a normal HttpResponse. HttpResponseRedirect takes a single argument: the URL to which the user will be redirected. We should always return an HttpResponseRedirect after successfully dealing with POST data.

4. We are using the reverse() function in the HttpResponseRedirect constructor in this example. This function helps avoid having to hardcode a URL in the view function. It is given the name of the view that we want to pass control to and the variable portion of the URL pattern that points to that view. In this case, using the URLconf we set up in previous post, this reverse() call will return a string like '/polls/3/results/'  where the 3 is the value of question.id. This redirected URL will then call the 'results' view to display the final page.

As seen from the last line of the vote()

return HttpResponseRedirect(reverse('polls:results', args=(question.id,))) 

after the voting is done for a question the vote() view redirects to the results page for the question. Let’s write that view in the  polls/views.py:

def results(request, question_id):

question = get_object_or_404(Question, pk=question_id)
return render(request, 'polls/results.html', {'question': question})

To display the poll results we need to implement the results.html which will be created in the polls/templates/polls/results.html directory:

<h1>{{ question.question_text }}</h1>

<ul>
{% for choice in question.choice_set.all %}
    <li>{{ choice.choice_text }} -- {{ choice.votes }} vote{{ choice.votes|pluralize }}</li>
{% endfor %}
</ul>

<a href="{% url 'polls:detail' question.id %}">Vote again?</a>

Now let's open http://127.0.0.1:8000/ and take a poll:


To take poll click on the link and chose the answer and click vote:


Notice that the results page that gets updated each time we vote. If we submit the form without having chosen a choice, we should see the error message:


Share:

Sunday, November 3, 2019

PollOpinion site in Django-5 ( Making other pages for the PollSite)

It's time to create the other required views for the polls app. Open the polls\views.py file and add the following:

from django.shortcuts import render

# Create your views here.

def index(request):
    """The home page for Learning Log"""
    return render(request, 'polls/index.html')
   
def detail(request, question_id):
    return HttpResponse("You're looking at question %s." % question_id)
   
def results(request, question_id):
    response = "You're looking at the results of question %s."
    return HttpResponse(response % question_id)

def vote(request, question_id):
    return HttpResponse("You're voting on question %s." % question_id)


As we have created new views, the same should be registered with the polls.url, open polls/url.py and add the following:

from django.urls import path

from . import views

app_name = 'polls'
urlpatterns = [
    # Home page
    path('', views.index, name='index'),   
    # ex: /polls/5/
    path('<int:question_id>/', views.detail, name='detail'),
    # ex: /polls/5/results/
    path('<int:question_id>/results/', views.results, name='results'),
    # ex: /polls/5/vote/
    path('<int:question_id>/vote/', views.vote, name='vote'),
   
    ]


When a page is requested from your website – say, “/polls/5/”, Django will load the mysite.urls Python module because it’s pointed to by the ROOT_URLCONF setting. It finds the variable named urlpatterns and traverses the patterns in order. After finding the match at 'polls/', it strips off the matching text ("polls/") and sends the remaining text – "5/" – to the ‘polls.urls’ URLconf for further processing. There it matches '<int:question_id>/', resulting in a call to the detail() view as shown below:

detail(request=<HttpRequest object>, question_id=5)

The question_id=5 part comes from <int:question_id>. Using angle brackets “captures” part of the URL and sends it as a keyword argument to the view function. The :question_id> part of the string defines the name that will be used to identify the matched pattern, and the <int: part is a converter that determines what patterns should match this part of the URL path.

Usually a  view is responsible for returning an HttpResponse object containing the content for the requested page, or raising an exception such as Http404 and user defined implementation as it can read records from a database, use a template system such as Django’s – or a third-party Python template system, generate a PDF file, output XML, create a ZIP file on the fly, anything we want, using whatever Python libraries we want.

Now let's modify our index() function in the polls/views.py so that it displays the latest 5 poll questions in the system, separated by commas, according to publication date. See the following code:

def index(request):
"""The home page for Learning Log"""
"""return render(request, 'polls/index.html')"""
latest_question_list = Question.objects.order_by('-pub_date')[:5]
        output = ', '.join([q.question_text for q in latest_question_list])
        return HttpResponse(output)

Now if we open the http://127.0.0.1:8000/ page, it's blank.

Before we move ahead, let's focus a bit on the page design part as at the current stage a page's design is hard coded in the view, which isn't the best way as every time we wish to change design we have to change code at lot of places. Now we'll use Django’s template system to separate the design from Python by creating a template that the view can use. Let's modify our polls/templates/polls/index.html file and change it's code as shown below:

{% if latest_question_list %}
    <ul>
    {% for question in latest_question_list %}
        <li><a href="/polls/{{ question.id }}/">{{ question.question_text }}</a></li>
    {% endfor %}
    </ul>
{% else %}
    <p>No polls are available.</p>
{% endif %}

Next we update our index view in polls/views.py to use the template:

from django.shortcuts import render
from .models import Question
from django.http import HttpResponse
from django.template import loader

# Create your views here.

def index(request):

latest_question_list = Question.objects.order_by('-pub_date')[:5]
template = loader.get_template('polls/index.html')
context = {'latest_question_list': latest_question_list,
}
return HttpResponse(template.render(context, request))

There is a shortcut in Django which makes loading and returning response easier using the render(). Let's use this method in the code shown above and modify the def index(request) method:

def index(request):

latest_question_list = Question.objects.order_by('-pub_date')[:5]
template = loader.get_template('polls/index.html')
context = {'latest_question_list': latest_question_list,
}
        return render(request, 'polls/index.html', context)

The render() function takes the request object as its first argument, a template name as its second argument and a dictionary as its optional third argument. It returns an HttpResponse object of the given template rendered with the given context.

Now if we open the http://127.0.0.1:8000/ page it shows page displaying "No polls are available." The code loads the template called polls/index.html and passes it a context. The context is a dictionary mapping template variable names to Python objects. Since we didn't add any Poll question the page displays the  "No polls are available."

Next we'll modify the detail() in the views which  displays the question text for a given poll. See the modified method below:

def detail(request, question_id):

try:
        question = Question.objects.get(pk=question_id)
    except Question.DoesNotExist:
        raise Http404("Question does not exist")
    return render(request, 'polls/detail.html', {'question': question})

As you may have noticed the view raises the Http404 exception if a question with the requested ID doesn’t exist. Make sure to add from django.http import Http404 along with other import statements. We can use a helper function get_object_or_404() instead of automatically catching the ObjectDoesNotExist exceptions at a higher level. See the modified detail() method:

def detail(request, question_id):
question = get_object_or_404(Question, pk=question_id)
return render(request, 'polls/detail.html', {'question': question})

The get_object_or_404() function takes a Django model as its first argument and an arbitrary number of keyword arguments, which it passes to the get() function of the model’s manager. It raises Http404 if the object doesn’t exist.

Make sure to add from django.shortcuts import get_object_or_404, render along with other import statements.

It's time now to modify polls/templates/polls/detail.html file as shown below:

<h1>{{ question.question_text }}</h1>
<ul>
{% for choice in question.choice_set.all %}
    <li>{{ choice.choice_text }}</li>
{% endfor %}
</ul>

The template system uses dot-lookup syntax to access variable attributes. In the example of {{ question.question_text }}, first Django does a dictionary lookup on the object question. Failing that, it tries an attribute lookup – which works, in this case. If attribute lookup had failed, it would’ve tried a list-index lookup.

Method-calling happens in the {% for %} loop: question.choice_set.all is interpreted as the Python code question.choice_set.all(), which returns an iterable of Choice objects and is suitable for use in the {% for %} tag.

Our project has just one app, polls but in real Django projects, there might more. How does Django differentiate the URL names between them? For example, the polls app has a detail view, and so might an app on the same project that is for a blog. How does one make it so that Django knows which app view to create for a url when using the {% url %} template tag?

The answer is to add namespaces to your URLconf. In the polls/urls.py file, go ahead and add an app_name to set the application namespace:

from django.urls import path

from . import views

app_name = 'polls'
urlpatterns = [
# Home page
    path('', views.index, name='index'), 
    # ex: /polls/5/
    path('<int:question_id>/', views.detail, name='detail'),
    # ex: /polls/5/results/
    path('<int:question_id>/results/', views.results, name='results'),
    # ex: /polls/5/vote/
    path('<int:question_id>/vote/', views.vote, name='vote'),
 
    ]

Another simplification we can do is by removing hardcoded URLs in templates. When we wrote the link to a question in the polls/index.html template, the link was partially hardcoded like this:

<li><a href="/polls/{{ question.id }}/">{{ question.question_text }}</a></li>

The problem with this hardcoded, tightly-coupled approach is that it becomes challenging to change URLs on projects with a lot of templates. However, since we defined the name argument in the path() functions in the polls.urls module, we can remove a reliance on specific URL paths defined in our url configurations by using the {% url %} template tag:

<li><a href="{% url 'detail' question.id %}">{{ question.question_text }}</a></li>

The way this works is by looking up the URL definition as specified in the polls.urls module. We can see exactly where the URL name of ‘detail’ is defined below:
...
# the 'name' value as called by the {% url %} template tag
path('<int:question_id>/', views.detail, name='detail'),
...

Now we'll change our polls/templates/polls/index.html template from:


<li><a href="{% url 'detail' question.id %}">{{ question.question_text }}</a></li>

to point at the namespaced detail view:

<li><a href="{% url 'polls:detail' question.id %}">{{ question.question_text }}</a></li>

Now go to http://127.0.0.1:8000/admin/ and add one question: I've added Most popular programming language? 

If we open http://127.0.0.1:8000/ we should see the following on our page
In the next post we shall implement the choice functionality to be used with the poll question. Till we meet next keep practicing and learning Python as Python is easy to learn!
Share:

Thursday, October 31, 2019

PollOpinion site in Django-4 ( Making pages for the PollSite)

In Django making web pages consists of three stages: defining URLs, writing views, and writing templates. First, you must define patterns for URLs. A URL pattern describes the way the URL is laid out and tells Django what to look for when matching a browser request with a site URL so it knows which page to return.

Each URL then maps to a particular view—the view function retrieves and processes the data needed for that page. The view function often calls a template, which builds a page that a browser can read. It's better to make a home page for our Pollsite and see how the three stages I just mentioned actually works.

We request pages by entering URLs into a browser and clicking links, so we’ll need to decide what URLs are needed in our project. The home page URL is first: it’s the base URL people use to access the project. At the moment, the base URL, http://localhost:8000/, returns the default Django site that lets us know the project was set up correctly. We’ll change this by mapping the base URL to Pollsite’s home page.

From C:\Projects\PollSite\Poll_Opinion open the urls.py file whose content is shown below:

from django.contrib import admin
from django.urls import path

urlpatterns = [
    path('admin/', admin.site.urls),
]

In this urls.py file, which represents the project as a whole, the urlpatterns variable includes sets of URLs from the apps in the project. The code in the path()method includes the module admin.site.urls, which defines all the URLs that can be requested from the admin site. Here we'll add the code to our home page as shown below:

from django.contrib import admin
from django.urls import path, include
urlpatterns = [
  
    path('admin/', admin.site.urls),
    path('', include('polls.urls')),
]
Now we need to make a second urls.py file in the C:\Projects\PollSite\polls folder and add the following code to it:

from django.urls import path

from . import views

app_name = 'polls'
urlpatterns = [
    # Home page
    path('', views.IndexView.as_view(), name='index'),
   
    ]

We import path from the django.urls module needed to map the urls to views. We also import the views module ; the dot tells Python to import views from the same directory as the current urls.py module. The variable urlpatterns in this module is a list of individual pages that can be requested from the Polls app.

The actual URL pattern is a call to the path() function, which takes three arguments. The first is a regular expression. Django will look for a regular expression in urlpatterns that matches the requested URL string. Therefore, a regular expression will define the pattern that Django can look for.

In its entirety, this expression tells Python to look for a URL with nothing between the beginning and end of the URL. Python ignores the base URL for the project (http://localhost:8000/), so an empty regular expression matches the base URL. Any other URL will not match this expression, and Django will return an error page if the URL requested doesn’t match any existing URL patterns.

The second argument in path() specifies which view function to call. When a requested URL matches the regular expression, Django will call views.index (we’ll write this view function soon).

The third argument provides the name index for this URL pattern so we can refer to it in other sections of the code. Whenever we want to provide a link to the home page, we’ll use this name instead of writing out a URL.

Out of the three stages we mentioned in the beginning of this post we have completed the first stage, now we'll move on to the second stage which is writing a view function. A view function takes in information from a request, prepares the data needed to generate a page, and then sends the data back to the browser, often by using a template that defines what the page will look like.

The file views.py in C:\Projects\PollSite\polls was generated automatically when we ran the command python manage.py startapp. Here’s what’s in views.py right now:

from django.shortcuts import render

# Create your views here.

Currently, this file just imports the render() function, which renders the response based on the data provided by views. The following code is how the view for the home page should be written:

from django.shortcuts import render

# Create your views here.

def index(request):
    """The home page for Learning Log"""
    return render(request, 'polls/index.html')


When a URL request matches the pattern we just defined, Django will look for a function called index() in the views.py file. Django then passes the request object to this view function. In this case, we don’t need to process any data for the page, so the only code in the function is a call to render().
The render() function here uses two arguments—the original request object and a template it can use to build the page. Let’s write this template now which is the third and final stage to create a web page.

A template sets up the structure for a web page and defines what the page should look like, and Django fills in the relevant data each time the page is requested. A template allows us to access any data provided by the view. As for now our view for the home page provided no data, this template is fairly simple.

We need to create a directory structure first in the C:\Projects\PollSite\polls folder. Make a new folder called templates. Inside the templates folder, make another folder called polls. This sets up a structure that Django can interpret unambiguously, even in the context of a large project containing many individual apps. Inside the inner polls folder (C:\Projects\PollSite\polls\templates\polls), make a new file called index.html. Add the following code into that file:

<p>Poll Questions</p>

<p>Click on the question to take part in the Poll</p>

Now that our template is ready we have fulfilled the criteria for the web page creation. Now when we request the project’s base URL, http://localhost:8000/, we’ll see the page we just built instead of the default Django page. Django will take the requested URL, and that URL will match the pattern ' '; then Django will call the function views.index(), and this will render the page using the template contained in index.html. The resulting page should be as shown below:


We have just created our first webpage, the home page for our poll application. In our poll application, we’ll have the following four views:

Question “index” page – displays the latest few questions.
Question “detail” page – displays a question text, with no results but with a form to vote.
Question “results” page – displays results for a particular question.
Vote action – handles voting for a particular choice in a particular question.

In the coming posts we shall create each of these pages.


Share:

PollOpinion site in Django-3 ( The Django Admin Site)

When we define models for an app, Django makes it easy for us to work with our models through the admin site. A site’s administrators use the admin site, not a site’s general users. Now we’ll set up the admin site and use it to add some questions through the Question model.

Creating a superuser

Django allows you to create a user who has all privileges available on the site, called a superuser. A privilege controls the actions a user can take. The most restrictive privilege settings allow a user to only read public information on the site. Registered users typically have the privilege of reading their own private data and some selected information available only to members. To effectively administer a web application, the site owner usually needs access to all information stored on the site. To create a superuser in Django, enter the following command and respond to the prompts:

(pollsite_env) C:\Projects\PollSite>python manage.py createsuperuser
Username (leave blank to use 'python'): pollsite_admin
Email address:
Password:
Password (again):
This password is too short. It must contain at least 8 characters.
This password is too common.
Bypass password validation and create user anyway? [y/N]: y
Superuser created successfully.

(pollsite_env) C:\Projects\PollSite>


When you issue the command createsuperuser, Django prompts you to enter a username for the superuser. Here we’re using pollsite_admin, but you can enter any username you want. You can enter an email address if you want or just leave this field blank. You’ll need to enter your password twice. I have used a simple password hence I choose to Bypass password validation.

Registering a Model with the Admin Site

Django includes some models in the admin site automatically, such as User and Group, but the models we create need to be registered manually.  From C:\Projects\PollSite\polls directory open admin.py file to register the Question Model:

from django.contrib import admin
from .models import Question

# Register your models here.

admin.site.register(Question)


This code imports the model we want to register Question Model and then uses admin.site.register() to tell Django to manage our model through the admin site.

Go to http://localhost:8000/admin/, enter the username and password for the superuser we just created, and you should see a screen like the one shown below:


In case the model doesn't show then restart the server running in the other terminal by executing python manage.py runserver command.

We can add questions by clicking the Add button button at this stage the complete functionality of the project has not been implemented. So instead of adding questions we'll move on to create our next model, Choice which will give us options to select an answer for the Question asked in Poll. The code for the Choice model is shown below:

class Choice(models.Model):
    question = models.ForeignKey(Question, on_delete=models.CASCADE)
    choice_text = models.CharField(max_length=200)
    votes = models.IntegerField(default=0)
   
    def __str__(self):
        return self.choice_text

Add this code to the models.py file. The Choice model has two fields: the text of the choice and a vote tally. Each Choice is associated with a Question and this relationship is defined, using ForeignKey that tells Django each Choice is related to a single Question. Django supports all the common database relationships: many-to-one, many-to-many, and one-to-one.

As we’ve added a new model, we need to migrate the database again. Run the command python manage.py makemigrations polls, and then run the command python manage.py migrate. Migrate the database and check the output:

(pollsite_env) C:\Projects\PollSite>python manage.py makemigrations polls
Migrations for 'polls':
  polls\migrations\0002_choice.py
    - Create model Choice

(pollsite_env) C:\Projects\PollSite>python manage.py migrate
Operations to perform:
  Apply all migrations: admin, auth, contenttypes, polls, sessions
Running migrations:
  Applying polls.0002_choice... OK

(pollsite_env) C:\Projects\PollSite>

A new migration called 0002_choice.py is generated, which tells Django how to modify the database to store information related to the model Choice. When we issue the migrate command, we see that Django applied this migration, and everything was okay. As we did before for the Question model, we'll register the Choice model with the admin.py. Modify the admin.py file as shown below:

from django.contrib import admin
from .models import Question,Choice

# Register your models here.

admin.site.register(Question)
admin.site.register(Choice)

Go back to http://localhost/admin/, and you should see Choices listed under Questions. It’s important to add __str__() methods to your models, not only for your own convenience when dealing with the interactive prompt, but also because objects’ representations are used throughout Django’s  automatically-generated admin.

Note these are normal Python methods. Let’s add a custom method to the Question model as shown below:

class Question(models.Model):
    question_text = models.CharField(max_length=200)
    pub_date = models.DateTimeField('date published')
   
    def __str__(self):
        return self.question_text
       
    def was_published_recently(self):
        now = timezone.now()
        return now - datetime.timedelta(days=1) <= self.pub_date <= now


We'll use this function later as of now this was just to demonstrate how to create custom method in our models. We also have to import the respective modules like the datetime and from django.utils import timezone, to reference Python’s standard datetime module and Django’s time-zone-related utilities in django.utils.timezone, respectively.


Share: